The Driver Syndicate/Level Editor
Level Editor aka Mr City Builder is the official world creation tool for The Driver Syndicate and it is include with the SDK of the game.
It can be used to:
- Create city architecture - heightfields and basic geometry.
- Place models created in 3D modeling packages.
- Place game objects for gameplay.
- Lay on the roads for traffic, cops and getaway AI to navigate on
Getting Started
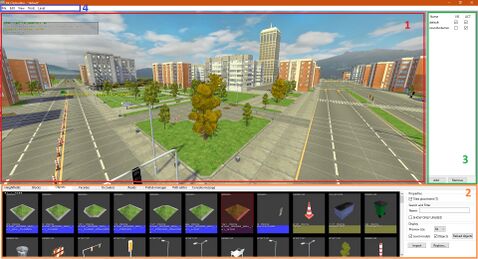
Level editor layout consists of 4 main elements (see screenshot):
- Viewport
- Tool panel
- Visibility Groups (VisGroups) panel
- Menu
Viewport is used to do all of the editing of the level and editing actions are depending on what tool tab is selected in Tool Panel.
VisGroups provides control over visible objects and those visibility groups are defined by user.
Menu contains additional entries with actions, visibility settings, tools and level actions.
Tool Panel consists of the 8 tabs that represents various tools that are used for authoring a level.
Menu overview
Menu items are associates with some hotkeys and can be found on the right of each item
- File - for creating, loading and saving the level
- Edit - has Undo and Redo actions (not currently available for all tools)
- View - viewport settings, allows to hide certain object types, display helpers and change drawing settings and even environment
- Tools - extra tools that not associated with editing in viewport, such as Region Editor
- Level - some useful actions
- Reload Environments - reloads the environments list
- Reload all materials - reloads all materials, use in case if you did changes to them or added new ones.
- Append other models file - Useful for map makers who do multiple maps, we can import models from another map.
- Rebuild road textures - rebuilds road textures (old outdated way to auto-generate road textures)
- Check traffic lights - shows you traffic lights that are not connected to roads properly
- Generate roads - generates new road IDs, and highlights roads and junctions for you if they are incorrectly done.
Note: New roads and traffic light light checking is also performed upon level save.
Tools Overview
Each tool allows to edit specific parts of the level and they have separate set of features and capabilities.
| Heightfields | Blocks | Objects | Facades | Occluders | Roads | Prefab Manager | Path Editor |
|---|---|---|---|---|---|---|---|
| Creates level terrain structure using heightmaps and quickly apply materials to surfaces | Creates level solid geometry which can be used both as structure filling and for prototyping | Used to place various models as structural objects on level and also to add dynamic/gameplay objects to bring a life and variety to the city. | Used to create continous walls using models | Used to hide objects obstructed by other objects for optimization purposes and improving overall performance of the level | Allows to place Straights, Junctions and Parking lots on the level | Allows to store commonly used/repeptetive level parts as a prefabs to use them later as a building blocks for faster creation of the cities | Allows to edit line segment paths which could be used for scripted objects and ambient sounds |
Viewport controls
Holding Shift lets you control the camera of the level editor.
- Drag with Left Mouse button: rotate camera
- Drag with Right mouse button: camera dolly mode (move forward and back)
- Drag with Middle mouse button: moves camera up-down and left-right
- Rotating Mouse wheel: changes camera movement speed
Visibility groups
On the right hand side you will see a toggle for "default" with two check boxes.
- Vis (Visible) - sets the group visibility in the editor
- Act (Active) - sets the group as visible and active in the game
New VisGroup is created by simply clicking on Add button at the bottom of panel.
To add Level Objects and Blocks to a VisGroup
- select them
- press N to bring up the Properties Window
- chose one under Vis group.
If anything is missing please reach out to Soapy, NikkiChan92, SwissCruiser, Sherbet, or Commando52Colton, we will be happy to assist you and update this page!

