The Driver Syndicate/Level Editor/Prefabs: Difference between revisions
SwissCruiser (talk | contribs) No edit summary |
SwissCruiser (talk | contribs) |
||
| (2 intermediate revisions by the same user not shown) | |||
| Line 1: | Line 1: | ||
Prefabs allows to store commonly used/repeptetive level parts as a prefabs to use them later as a building blocks for faster creation of the cities | Prefabs allows to store commonly used/repeptetive level parts as a prefabs to use them later as a building blocks for faster creation of the cities. | ||
Prefabs are saved in separate files located in the editor_prefabs folder within the addon folder belonging to the opened level. This also allows you to share them with other users or mods/addons because you can simply copy the files. | |||
== Viewport controls == | == Viewport controls == | ||
Camera control remains the same as described in [[The Driver Syndicate/Level Editor#Viewport controls|Level Editor Viewport controls]] | Camera control remains the same as described in [[The Driver Syndicate/Level Editor#Viewport controls|Level Editor Viewport controls]] | ||
=== Placement mode === | === Placement mode === | ||
# Choose prefab from the list using double click | # Choose prefab from the list using double click | ||
| Line 16: | Line 16: | ||
== Prefab manager panel == | == Prefab manager panel == | ||
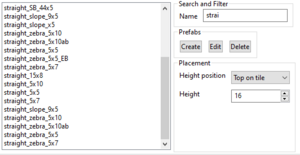
[[File:Prefab manager tool.png|thumb|Overview of the prefab manager panel]] | |||
=== Search and filter === | === Search and filter === | ||
Latest revision as of 09:18, 13 January 2025
Prefabs allows to store commonly used/repeptetive level parts as a prefabs to use them later as a building blocks for faster creation of the cities.
Prefabs are saved in separate files located in the editor_prefabs folder within the addon folder belonging to the opened level. This also allows you to share them with other users or mods/addons because you can simply copy the files.
Viewport controls
Camera control remains the same as described in Level Editor Viewport controls
Placement mode
- Choose prefab from the list using double click
- Ctrl + Mousewheel: adjusts the height of placement
- Space: rotate by 90 degrees
- ESC: cancel placement
Creation mode
- Select the region by dragging mouse with left button pressed (first make sure that no prefab is selected)
- Press Create button on the panel
Prefab manager panel
Search and filter
Enter a name to show specific prefabs in the list
Prefabs
Also see above in Viewport controls
To edit prefab simply select it from the list using double click and press Edit button. Note that it will close current level
Delete: deletes selected prefab
Placement
Height position
Bottom on tile: the prefab is placed at the set height above the marked tile based on the height at which the prefab was originally created.
Top on tile: the prefab is placed with the highest tile it contains at the set height above the marked tile.
Exact height: the prefab is placed with the highest tile it contains at the set height.
Height
Set here the height for placing the prefab on.
