The Driver Syndicate/Level Editor/Blocks: Difference between revisions
Jump to navigation
Jump to search
SwissCruiser (talk | contribs) |
SwissCruiser (talk | contribs) |
||
| (One intermediate revision by the same user not shown) | |||
| Line 3: | Line 3: | ||
== Viewport controls == | == Viewport controls == | ||
Camera control remains the same as described in [[The Driver Syndicate/Level Editor#Viewport controls|Level Editor Viewport controls]] | Camera control remains the same as described in [[The Driver Syndicate/Level Editor#Viewport controls|Level Editor Viewport controls]] | ||
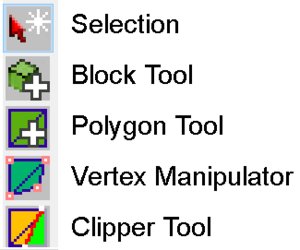
[[File:Block Tools.png|thumb|The tools for editing blocks]] | |||
=== Selection tool === | |||
# CTRL + right click: Toggle face selection (each face will be adjustable when highlighted) | # CTRL + right click: Toggle face selection (each face will be adjustable when highlighted) | ||
# CTRL + left click: Toggle all faces | # CTRL + left click: Toggle all faces | ||
| Line 14: | Line 14: | ||
# ALT-G: ungroup block objs | # ALT-G: ungroup block objs | ||
=== Block Tool === | |||
for creating new blocks | |||
#Select a texture from the texture list | |||
# Left click and drag, this will draw a box on the grid. | |||
# Press enter and your starting block will appear. | |||
=== Polygon Tool === | |||
Not yet ready! | |||
=== Vertex Manipulator === | |||
# CTRL + Left click: select vertex | # CTRL + Left click: select vertex | ||
# CTRL + Double Click on face: select all vertices on the face | # CTRL + Double Click on face: select all vertices on the face | ||
| Line 21: | Line 30: | ||
# R: rotate | # R: rotate | ||
=== Clipper Tool === | |||
# Clipper Controls: (highlight all faces with selection tool before selecting Clipper Tool) | # Clipper Controls: (highlight all faces with selection tool before selecting Clipper Tool) | ||
# CTRL + Mouse click and drag to draw a cutting line | # CTRL + Mouse click and drag to draw a cutting line | ||
# SHIFT + X to select side (Side A, Side B, straight line to cut model but keep both sides) | # SHIFT + X to select side (Side A, Side B, straight line to cut model but keep both sides) | ||
# Enter - Apply the cut | # Enter - Apply the cut | ||
== Model Exporter == | == Model Exporter == | ||
Latest revision as of 20:28, 24 January 2025
Block tool allows to create solid geometry which can be used both as structure filling and for prototypin
Viewport controls
Camera control remains the same as described in Level Editor Viewport controls
Selection tool
- CTRL + right click: Toggle face selection (each face will be adjustable when highlighted)
- CTRL + left click: Toggle all faces
- G: move
- R: rotate
- (when all faces toggled) CTRL+Space to copy/paste model/block
- CTRL-G: group block objs together (useful when exporting block obj to blender)
- ALT-G: ungroup block objs
Block Tool
for creating new blocks
- Select a texture from the texture list
- Left click and drag, this will draw a box on the grid.
- Press enter and your starting block will appear.
Polygon Tool
Not yet ready!
Vertex Manipulator
- CTRL + Left click: select vertex
- CTRL + Double Click on face: select all vertices on the face
- G: move
- R: rotate
Clipper Tool
- Clipper Controls: (highlight all faces with selection tool before selecting Clipper Tool)
- CTRL + Mouse click and drag to draw a cutting line
- SHIFT + X to select side (Side A, Side B, straight line to cut model but keep both sides)
- Enter - Apply the cut
Model Exporter
- Select one or more brushes and right click to bring up context menu
- Export as OBJ. Chose the location and click save
- You can now move your block obj to blender for texturing, apply proper UVs and further import ready model using Level Objects
Note: In it's current state block tool is best used for making draft meshes (aka gray box) of the buildings you intend to create. You can add further detail to these meshes in blender, with the added benefit of your models already being the correct size and scale.
Using block tool to make sound domains.
- Make a new block, use occluder textures.
- Select it using a selection tool
- Press N to bring up Properties Window
- Select Object def other than <static> and you can choose between a few volume types. (make sure your levelname_objects.def references the required .def file or contains the volume definition)
