The Driver Syndicate/Vehicles/Creating Vehicle Models: Difference between revisions
No edit summary |
m (→LOD Models) |
||
| (9 intermediate revisions by 2 users not shown) | |||
| Line 1: | Line 1: | ||
The Driver Syndicate vehicles are utilizing many of EGF features such as ''phyiscs model, skinning, animations'', ''body groups'' and ''LODs''. | The Driver Syndicate vehicles are utilizing many of EGF features such as ''phyiscs model, skinning, animations'', ''body groups'' and ''LODs''. | ||
==Coordinate system and alignment== | |||
[[File:Car_model_allignment.png|alt=Car model allignment.png|thumb|454x454px|Alignment of model]] | |||
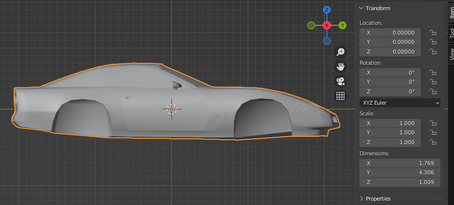
The Driver Syndicate uses metric system and Blender unit by default is equal to 1 meter. | |||
Note that there are slight differences of coordinate systems axes between Blender (Z+ is up and Y+ is forward) and The Driver Syndicate (Y+ is up and Z+ is forward) | |||
Using this knowledge, you'll need to align the front of our vehicle by the Y axis. | |||
==Applying materials == | |||
[[File:Car_material_names.png|alt=Material names that a vehicle named Vette could use.|left|thumb|170x170px]] | |||
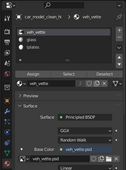
Material names in Blender are going to correspond the name of [[Material System/Materials|material file]] located in materials folder after you export and compile your model. | |||
Materials/textures that are unique to the vehicle can have any name, but should be named after the vehicle, and not be the same as any other materials/textures. | |||
In this example screenshot there are three materials which are '''veh_vette''', '''glass''' and '''lplates'''. | |||
The lplates name stands for license plates and it's UVs should be mapped to [0,0] - [1,1] | |||
==Damage Model Overview== | ==Damage Model Overview== | ||
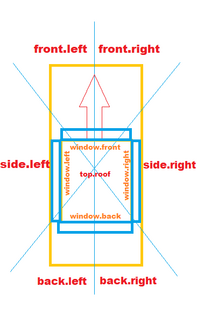
[[File:Damagemdl.png|thumb|329x329px|Damage zones]] | [[File:Damagemdl.png|thumb|329x329px|Damage zones]]Damage model is very similar to the ''Driver 1'' and ''Driver 2'' and utilizes separate model file with '''pre-defined damaged shape'''. | ||
Damage model is very similar to the ''Driver 1'' and ''Driver 2'' and utilizes separate model file with '''pre-defined damaged shape'''. | |||
Vertices are assigned to the specific damage zones and this allows blending of individual parts between clean undamaged shape to the damaged shape. | Vertices are assigned to the specific damage zones and this allows blending of individual parts between clean undamaged shape to the damaged shape. | ||
| Line 43: | Line 52: | ||
For example, if '''front.left''' or '''front.right''' getting damaged more than 75%, it will take damaged appearance. | For example, if '''front.left''' or '''front.right''' getting damaged more than 75%, it will take damaged appearance. | ||
==Armature == | ==Making Armature == | ||
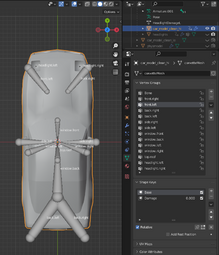
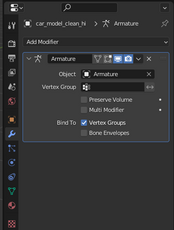
[[File:Car_Armature_Bone_Names.png|thumb| | [[File:Car_Armature_Bone_Names.png|thumb|255x255px|An armature with all available bone names, along with a random "Bone" bone, headlight bones can be omitted for cars without popup headlights.]][[File:Car armature modifier.png|thumb|Modifier to make a car work with the armature.|left|230x230px]]'''Armature''' must be added for a vehicle to have cosmetic damage. | ||
[[File:Car armature modifier.png|thumb | |||
The object that represents a Vehicle model also need to have an '''Armature''' modifier that points to the right armature. | |||
A ''' | If you want to make certain parts of models damageable, you'll need to create bones with names that are described in '''Damage Model Overview''' section above. | ||
A damage shape key named '''Damage''' is used for the damage of Driver Syndicate vehicles.<p> | |||
Usual ways of creating a Damage shape key are: | You can also copy the Vette's or the Carla's armature, and pasting that into your model's will work too. | ||
==Rigging Your Vehicle== | |||
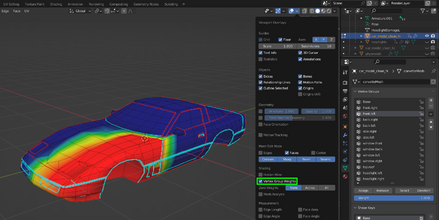
[[File:Car_weight_assigning.png|thumb|439x439px|Almost acceptable rigging.]]Vehicle must have '''vertex groups''' that correspond with the names of the bones from the armature. Vertex groups can be auto-generated in Blender when parenting armature to object or make them by hand.<p>Areas of the vehicle can be assigned to vertex groups either by highlighting them in '''Edit Mode''' and clicking '''Assign''', by using '''Weight Painting''', or with a combination of the two.<p>Weight groups should be assigned in the correct area for each bone. The center for the front and back of the car should be assigned for the front and back bones.<p>For all the windows, you must specify only affected window vertices.<p>Popup headlights '''should not be assigned to the front.left or front.right bones''', instead, they are assigned to headlight.left and headlight.right and their damage is animated in timeline. | |||
== Creating Damaged Shape == | |||
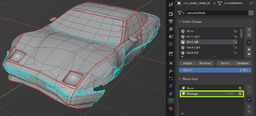
[[File:Car_damage_shapekey.png|alt=That's a lot of Shape Key|left|thumb|256x256px|A damaged model defined by the Damage shape key]] | |||
<p>'''Shape key''', generally named '''Base''' or '''Basis''', is used as the regular, undamaged shape of the car.<p>A damage shape key, usually named '''Damage''' is used for the damage of The Driver Syndicate vehicles. The name is important only for the ESC script.<p>Usual ways of creating a Damage shape key are: | |||
*Moving the front and back bumpers towards the center of the car | *Moving the front and back bumpers towards the center of the car | ||
*Flaring out the quarter panels | *Flaring out the quarter panels | ||
*Moving the center rows of the hood and trunk up | *Moving the center rows of the hood and trunk up | ||
== | |||
. | == LOD Models == | ||
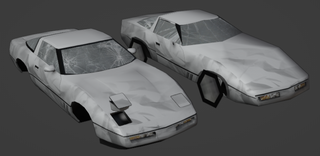
A . | [[File:Car low poly1.png|320px|thumb|The Vette and its low poly counterpart.]]A low LOD (Level of Detail) model is used for vehicles that are far away from the player to increase game performance. | ||
A vehicle's low LOD model should follow the general shape of the vehicle. | |||
The low LOD should also have the main vehicle model's texture and a similar UV mapping. | |||
# | When the low LOD swaps in, details such as the wheels and driver for a car disappear. Because of this, it's a good idea to have a low poly stand-in for the wheels. | ||
# | |||
[[File: | If there are bodygroups that are noticeable from a distance, they can have a low LOD model separate from the main low LOD. | ||
==Physics Model== | |||
[[File:Car physmodel top.png|130px|left]]A physics model is the model of a car that collides with objects in the world. | |||
The physics model is the general shape of the car. | |||
The physics model is generally a little bit shorter than the front and back bumper. | |||
The front and back of the physics model comes up at the bottom to help cars land smoothly. | |||
If a car has a particularly low front or back end, the physics model can come higher to make collisions more regular. | |||
A physics model shouldn't wrap around smaller details such as spoilers and mirrors. | |||
[[File:Car physmodel side.png|400px]] | |||
==Exporting FBX== | |||
[[File:Car export fbx.png|thumb|375x375px|Clicking on File > Export > FBX.]]'''Autodesk FBX''' is the best intermediate format suited for vehicle and other models.<p>Reasons to use FBX over ESM models: | |||
#Consistent between newer versions of Blender | |||
#Lack of ESM model exporter for Blender | |||
#Better handling of shape keys and animations | |||
#Can contain multiple models inside so you can use single file for multiple meshes inside EGF model | |||
# | |||
Blender's default settings for exporting to FBX usually work well enough, this will put every model into one FBX file. | |||
'''NOTE''': Exporting FBX will not apply the model's Transform, Rotation and Scale and you need to apply Object rotation and Scale manually. | |||
== Compiling EGF== | |||
[[File:Car_esc1.png|alt=a diagram of a bunch of incoherent arrows connecting seemingly random bits of text that might tell you what points to what if you squint hard enough.|thumb|436x436px|Relations to the Blender's objects in ESC script]] | |||
Compiling '''EGF''' model first requires you to create regulare '''ESC''' script file which can be compiled with '''EGFMan'''. | |||
For vehicle models it is required to have '''physics model'''. | |||
As damaged car model is a separate EGF file, you'll need to create separate ESC file that compiles only damaged model:<syntaxhighlight lang="cpp" line="1"> | |||
// output model filename | |||
modelfilename "models/vehicles/vette_dam.egf"; | |||
// add material paths | |||
materialpath "models/vehicles"; | |||
// define models | |||
FBXSource "corvette.fbx" | |||
{ | |||
car_model_clean_hi "body1" shapeby "damage"; | |||
headlights "headlights" shapeby "damage"; | |||
} | |||
// bodygroup def | |||
bodygroup "body" "body1"; | |||
bodygroup "popupHeadlights" "headlights"; | |||
</syntaxhighlight>In this example: | |||
# We specified alternative modelfilename | |||
# Added '''shapeby "Damage"''' which will apply Damage shape key to the '''car_model_clean_hi''' mesh | |||
# We don't need any LODs, additional body groups and physics models. | |||
<p>Once a '''.ESC''' file is created, EGFMan can be used to compile this script, and create EGF model for the game.<p><p>[[File:Car egfman1.png|300px]] [[File:Car egfman2.png|389x389px]] [[File:Car egfman3.png|300px|Wow Soapy, 0 faces!? Your optimization skills are demonic]]<p> | |||
== See Also == | |||
<p>[[Engine Tools/egfCa|Model Compiler Reference]]<p>[[The Driver Syndicate/Vehicles/Configuration File|Vehicle Configuration File]]<p> | |||
Revision as of 15:29, 1 February 2023
The Driver Syndicate vehicles are utilizing many of EGF features such as phyiscs model, skinning, animations, body groups and LODs.
Coordinate system and alignment
The Driver Syndicate uses metric system and Blender unit by default is equal to 1 meter.
Note that there are slight differences of coordinate systems axes between Blender (Z+ is up and Y+ is forward) and The Driver Syndicate (Y+ is up and Z+ is forward)
Using this knowledge, you'll need to align the front of our vehicle by the Y axis.
Applying materials
Material names in Blender are going to correspond the name of material file located in materials folder after you export and compile your model.
Materials/textures that are unique to the vehicle can have any name, but should be named after the vehicle, and not be the same as any other materials/textures.
In this example screenshot there are three materials which are veh_vette, glass and lplates.
The lplates name stands for license plates and it's UVs should be mapped to [0,0] - [1,1]
Damage Model Overview
Damage model is very similar to the Driver 1 and Driver 2 and utilizes separate model file with pre-defined damaged shape.
Vertices are assigned to the specific damage zones and this allows blending of individual parts between clean undamaged shape to the damaged shape.
For vehicle to support damage model, it needs to be set up in specific way but it is pretty similar to the regular skinning setup as it utilizes Shape Key and Armature
Vehicles in game identifying damage zones in a directional manner and consist of 7 zones:
- front.left
- front.right
- side.left
- side.right
- back.left
- back.right
- top.roof (optional)
Each of the zones is meant to be damaged individually but there 4 more zones for car windows that are depending on zones above:
- window.front - affected by front.left and front.right
- window.back - affected by back.left and back.right
- window.left - affected by side.left
- window.right - affected by side.right
Each of the windows will appear damaged depending on the damage levels of zones they are affected by.
For example, if front.left or front.right getting damaged more than 75%, it will take damaged appearance.
Making Armature
Armature must be added for a vehicle to have cosmetic damage.
The object that represents a Vehicle model also need to have an Armature modifier that points to the right armature.
If you want to make certain parts of models damageable, you'll need to create bones with names that are described in Damage Model Overview section above.
You can also copy the Vette's or the Carla's armature, and pasting that into your model's will work too.
Rigging Your Vehicle
Vehicle must have vertex groups that correspond with the names of the bones from the armature. Vertex groups can be auto-generated in Blender when parenting armature to object or make them by hand.
Areas of the vehicle can be assigned to vertex groups either by highlighting them in Edit Mode and clicking Assign, by using Weight Painting, or with a combination of the two.
Weight groups should be assigned in the correct area for each bone. The center for the front and back of the car should be assigned for the front and back bones.
For all the windows, you must specify only affected window vertices.
Popup headlights should not be assigned to the front.left or front.right bones, instead, they are assigned to headlight.left and headlight.right and their damage is animated in timeline.
Creating Damaged Shape
Shape key, generally named Base or Basis, is used as the regular, undamaged shape of the car.
A damage shape key, usually named Damage is used for the damage of The Driver Syndicate vehicles. The name is important only for the ESC script.
Usual ways of creating a Damage shape key are:
- Moving the front and back bumpers towards the center of the car
- Flaring out the quarter panels
- Moving the center rows of the hood and trunk up
LOD Models
A low LOD (Level of Detail) model is used for vehicles that are far away from the player to increase game performance.
A vehicle's low LOD model should follow the general shape of the vehicle.
The low LOD should also have the main vehicle model's texture and a similar UV mapping.
When the low LOD swaps in, details such as the wheels and driver for a car disappear. Because of this, it's a good idea to have a low poly stand-in for the wheels.
If there are bodygroups that are noticeable from a distance, they can have a low LOD model separate from the main low LOD.
Physics Model
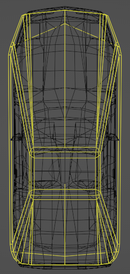
A physics model is the model of a car that collides with objects in the world.
The physics model is the general shape of the car.
The physics model is generally a little bit shorter than the front and back bumper.
The front and back of the physics model comes up at the bottom to help cars land smoothly.
If a car has a particularly low front or back end, the physics model can come higher to make collisions more regular.
A physics model shouldn't wrap around smaller details such as spoilers and mirrors.
Exporting FBX
Autodesk FBX is the best intermediate format suited for vehicle and other models.
Reasons to use FBX over ESM models:
- Consistent between newer versions of Blender
- Lack of ESM model exporter for Blender
- Better handling of shape keys and animations
- Can contain multiple models inside so you can use single file for multiple meshes inside EGF model
Blender's default settings for exporting to FBX usually work well enough, this will put every model into one FBX file.
NOTE: Exporting FBX will not apply the model's Transform, Rotation and Scale and you need to apply Object rotation and Scale manually.
Compiling EGF
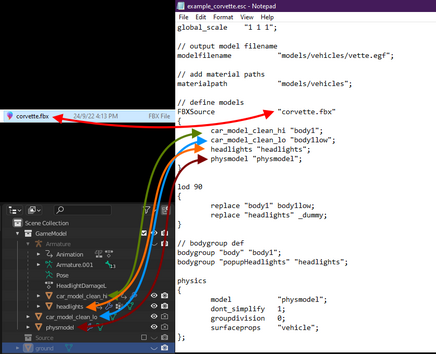
Compiling EGF model first requires you to create regulare ESC script file which can be compiled with EGFMan.
For vehicle models it is required to have physics model.
As damaged car model is a separate EGF file, you'll need to create separate ESC file that compiles only damaged model:
// output model filename
modelfilename   "models/vehicles/vette_dam.egf";

// add material paths
materialpath    "models/vehicles";

// define models
FBXSource       "corvette.fbx"
{
	car_model_clean_hi  "body1"         shapeby "damage";
	headlights          "headlights"    shapeby "damage";
}

// bodygroup def
bodygroup   "body"              "body1";
bodygroup   "popupHeadlights"   "headlights";
In this example:
- We specified alternative modelfilename
- Added shapeby "Damage" which will apply Damage shape key to the car_model_clean_hi mesh
- We don't need any LODs, additional body groups and physics models.
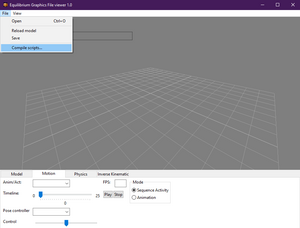
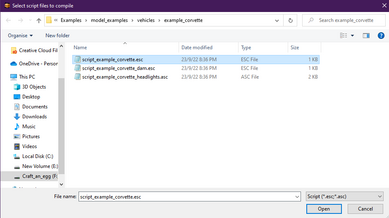
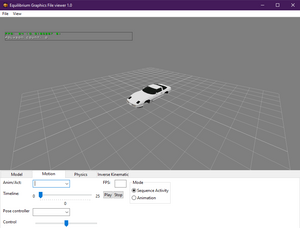
Once a .ESC file is created, EGFMan can be used to compile this script, and create EGF model for the game.
