The Driver Syndicate/Level Editor/Heightfields
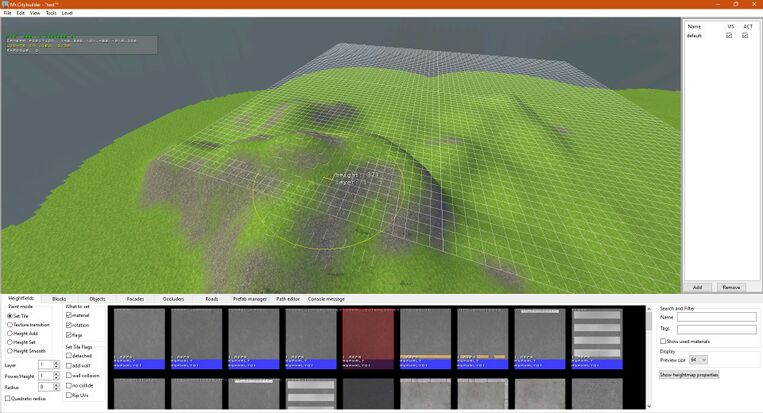
Heightfield tool creates level terrain structure using heightmaps and quickly apply materials to surfaces.
Controls for viewport
Camera control remains the same as described in Level Editor Viewport controls
- Space: rotate texture tile (some textures are locked and cannot be rotated)
- Control + Mouse wheel: Changes radius of tool
- Left mouse: sets tile texture and properties (see "What to set" and "Tile flags")
- Right mouse: deletes tile texture
- Middle mouse drag: draws a line and performs same as left mouse for each tile in line
- alt + left click on a tile in the viewport adopts its settings
Left panel
Paint modes
You can edit heightfields in various modes
- Set Tile - Set or paint your heightmap tiles. Be mindful of power/height settings.
- Texture Transition - Lets you transition between textures. (You must have a transition tile .mat set up)
- Height Add - Adds to the set power/ height. Useful for making smooth hills or mountain ranges quickly.
- Height Set - Sets the height.
- Height Smooth = Smooths the heightmap, good for beaches, hills, bumps, etc. (press and drag the mouse wheel to create ramps between tiles of different heights)
Pressing 1-5 on keyboard will also change paint mode
Brush settings
- Layer: current layer of heightfield to paint on
- Power/Height: Sets the height of your heightmap.
- Radius: Set the radius.
You can change radius by holding Ctrl and scrolling the mouse wheel.
There is 4 different layers of heightfields that lets you separate geometry and create something like bridges, beaches with sand running under water etc.
Please note that AI Roads are forced to be at LAYER 1 for the time being.
What to set
- material: when active the texture will be paintet
- rotation: when active the rotation of the texture will be applied
- flags: when active the tile flags will be applied
Tile flags
Tile flags define how geometry of heightfield is generated:
- Detached - tiles will not be sloped to surrounding tiles of non-detached
- Add wall - adds a wall to the detached tiles important for sidewalks
- Wall collision - adds wall collision to set tile. (Not needed for sidewalks)
- No collide - this tiles has no collision at all.
- Flip UVs - Flip the texture uv.
Pressing Q-T on keyboard will also toggle the flags
TIP: Use "View Heightfield Tile-Helpers" in the View tab to show you what kind of tiles are painted on region. Each color represents a specific flag.
Right panel
Search and filter
Enter a name or tag to search specific texture to show them in selection bar (texture list)
Display
Preview size for the textures 64, 128 or 256
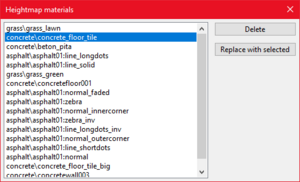
Heightmap Materials
- click on a tile in the viewport that contains a material
- now all materials in active region will be shown in the Heightmap material window
- Click on "Delete" to remove all tiles in active region that contains selectet material
- Click on "Replace with selected" to replace the texture selected in the window with the one selected in the selection bar in active region

