The Driver Syndicate/Addon System
The Driver Syndicate allows you to create the separate layer of code and data that is best described as addon.
It allows creators to expand the basic features. For example, it allows:
- Adding new levels and missions
- Extend game with new game modes, sounds and vehicles
- Apply modifiers to the game's behaviour
- Override base game resources such as HUD, main menu styles
Overview
The first important feature of Addon system is to introduce layers to the filesystem of the game and then it is further supported by the Lua scripting features of the game.
Game's Filesystem is a crucial part that allows to add and even override the files of the base game. Although overriding files is not recommended at most times, it still can have benefit of extending the game functionality.
When Addon is enabled, it's files becoming visible to the game and it's not possible to use them as if they would be in the GameData folder.
Addon directory
Now that you have an idea how addons work and already installed a few ones, let's make our own addon.
- You need to create the folder for your addon, just name it anything you want.
- Create ModInit.lua - a special file that will let game know that this folder contains addon data. You will need to put it inside your Addon folder.
Example of ModInit.lua
local ModInit = {
	Title = "Your crazy mod name here",

	CreatedBy = "Mod Author Name",
	Version = "1.0",
}

-- initialization function
function ModInit:Init()
    -- initialize your code stuff here
end,

-- deinitialization function
function ModInit:DeInit()
	-- de-initialize your code stuff here
end
In this example Title is the name of your addon that will be visible in Settings - Addons menu.
And that's it, you now have your addon created.
What's next?
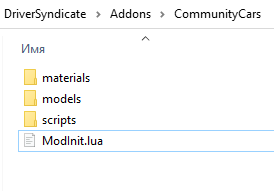
As we already know, addon folder is a layer over GameData. So you can create folders depending on your modding needs, just like in the GameData.
In the example screenshot seen here, there is a CommunityCars addon and it extends few GameData folders like materials, models and scripts.
Other examples of Addons might include folders like levels, replayData, resources, scripts and sounds folders.
| editor_prefabs | Used for prefabs used in your cities. See the level editor prefabs for more information. |
| levels | Stores your level.lev files and <levelname>_editor folders. |
| materials | Stores your textures and materials. |
| materialsSRC | (Should be not shipped) Stores source TGA textures and material files used to generate shipping DDS and MAT files |
| models | Stores your EGF models for game objects and vehicles |
| replayData | Store replays for cutscenes, pursuit chases and more |
| resources | Stores localization texts, UI schemes such as menus, HUD, loading screens |
| scripts | Stores many types of scripts. Vehicle scripts, environment properties, sound scripts and Lua scripts for menus, world missions and game modes. |
| sounds | Stores all WAV and OGG files. |
Further work with your addon
Now that you have all you need, you can have those little helpful files to make your development of addon happy.
Some of the game tools like EGFMan and Level Editor can be used work within your Addon scope.
You can put two separate BAT files in your addon folder with those contents to run
cd ..\..\Bin64\
start egfman -devAddon "Addons/YourAddonFolderName"
For Level Editor it will be the same
cd ..\..\Bin64\
start LevelEditor -devAddon "Addons/YourAddonFolderName"
Happy modding!

